Desktop FAQ AMLHub Frequently Asked
Questions
Desktop FAQ AMLHub Frequently Asked
Questions
Following the creation of your user account, you will be sent a verification email from the AMLHub. If you cannot find this email in your primary inbox, it may be in your junk mail or spam folder.
- Ensure the email is in your primary inbox, this may mean it has to be moved from your junk mail or spam folder
- Click ‘verify email’
- Set your password (minimum of 8 characters).
Your user account is now verified and will appear as ‘active’ in the AMLHub. You can login to both the AMLHub app or desktop with your email address and password.
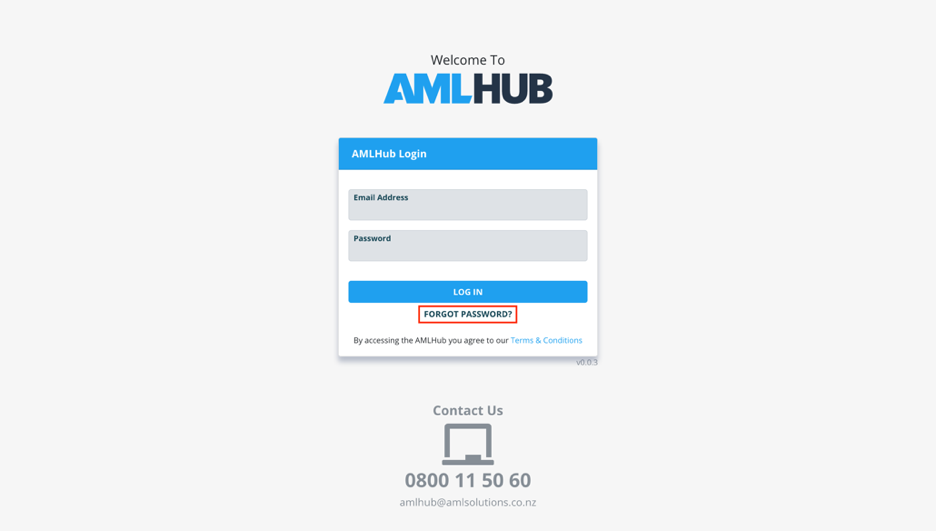
If you are unable to log in to the AMLHub app or desktop due to either forgetting or entering an incorrect password, this can be reset from the AMLHub desktop login page.
- Visit the AMLHub desktop login page (amlhub.co.nz).
- Click ‘forgot password?’.
- Enter the email address associated with your user account.
- Click send reset link.
You will be sent an email allowing you to reset your password. If you cannot find this email in your primary inbox, it may be in your junk mail or spam folder.
If you are able to log in to the AMLHub desktop, you can reset your password from either the AMLHub desktop homepage or dashboard of a branch.
- Click on the blue arrow icon found to the right of your name in the top right-hand corner of the screen.
- Click ‘profile’.
- Click ‘request password reset’.

A pop-up message will appear to signal a password reset email has been successfully sent to the email address associated with your user account. If you cannot find this email in your primary inbox, it may be in your junk mail or spam folder.
If you would like to update your details, you can do so from either the homepage or dashboard of a branch.
- Click on the blue arrow icon found to the right of your name in the top right-hand corner of the screen.
- Click ‘profile’.
- The following pop-up window will appear.
- Make any necessary changes to your first name, last name and/or email address.
- Click ‘save’

It is now safe to click ‘close’, and exit out of the pop-up window.
What does each colour signify for the tiles in the dashboard of a branch?
The tiles on your dashboard may appear as either red, orange or green, where each colour corresponds to a particular message.
- Green No warnings or issues.
- Orange One of more outstanding warnings.
- Red One or more outstanding issues.
- From the dashboard of a branch, click on the two horizontal blue arrows, found to the right of the branch's name.
- You will be directed to the homepage of the AMLHub desktop.
- Click on the branch you would like to switch to.
- You will be directed to the dashboard of the branch you have selected.
Logging out of your account can be done either from the AMLHub desktop homepage or the dashboard of a branch.
- Click on the blue arrow icon found to the right of your name in the top right-hand corner of the screen.
- Click ‘logout’.
- You will be directed to the login page of the AMLHub desktop.
If you require further assistance with navigation through the AMLHub desktop, click on the "? Help" icon, found in the top right-hand corner of the screen.
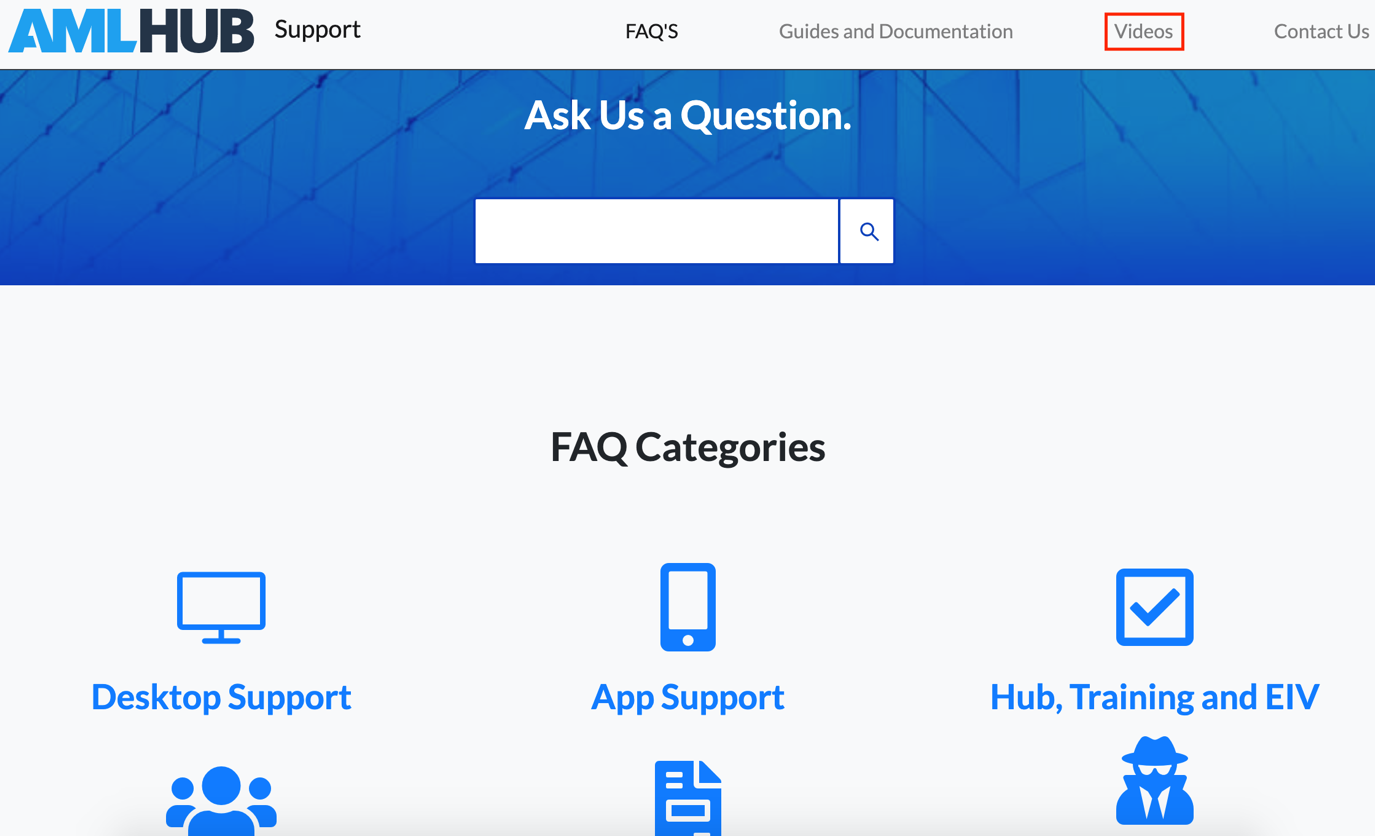
Additionally, training videos can be accessed from the support page by clicking on the ‘videos’ tab, found at the top of the screen.
Deleting a deal can only be done by someone with access to the CDD Register on the AMLHub desktop. To delete a deal in your CDD Register, the deal must be unverified..
- Visit the AMLHub desktop login page using the following URL https://amlhub.co.nz/login
- Login using the following credentials: Username: Email Address Password: as you created it through the verification email, unless you have reset it since then (must be a minimum of 6 characters)
- You will be directed to the homepage, where it asks you to select an entity. Please click on the entity of which you would like to proceed with.
- Navigate to your CDD Register either by clicking on the CDD Register tile or on the CDD Register section in the left-hand menu bar.
- You will be automatically directed to the “unverified deals” section of your CDD Register
- Click on the three grey dots directly to the right of the deal you would like to delete
- Select "delete".

A user is a member added to a branch. Depending on their allocated role, users are able to view different sections of the AMLHub desktop.
Users without staff memberships are those with no involvement in such AML obligations, for example, third party providers (CDD outsourcing). Users with no staff membership may be allocated to several branches, however, do not need to be vetted and cannot be added to the training register.
A staff member is a further classification of a user. A user meets the criteria for staff membership if they are involved in AML obligations, such as onboarding new vendors or clients. Staff members must be vetted.
Please note: to be added as a staff member, the user must have already been created and added to the branch. Adding a user can be done through the +Users button in the ‘Users’ section of the AMLHub desktop.
Classifying the user as a staff member can be done through the ‘Users’ section of the AMLHub desktop.
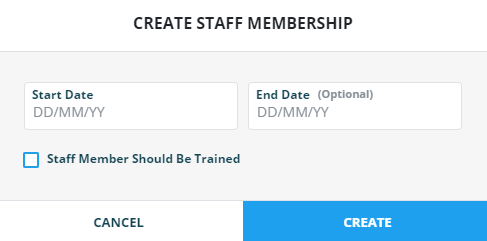
- Click on the "ADD" button found under the ‘Staff Member’ field adjacent to the user’s name.
- A window will appear, as shown in the image below.
- Enter the start date of the user; this should be the date the user started with the company. Entering the user’s end date is an optional field.
- Click on the ‘Staff Member Should Be Trained’ tick box, then select a respective training role for the user. If not selected, the staff member will not be added to the training register. Staff members must be added to the training register, where if they were not added upon creation this can be done through the training register at a later stage.
- Click ‘create’.
- A window will appear, as shown in the image below.
- The user is now an active staff member with a start date, which means they are ready for vetting.
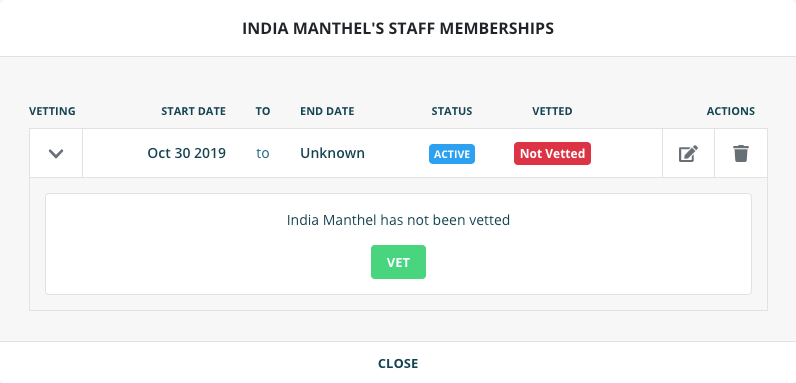
Please note: any staff member hired before the 1st of January 2019 can be exempted from the vetting process. All staff members hired after the 1st of January 2019 will need to be vetted.
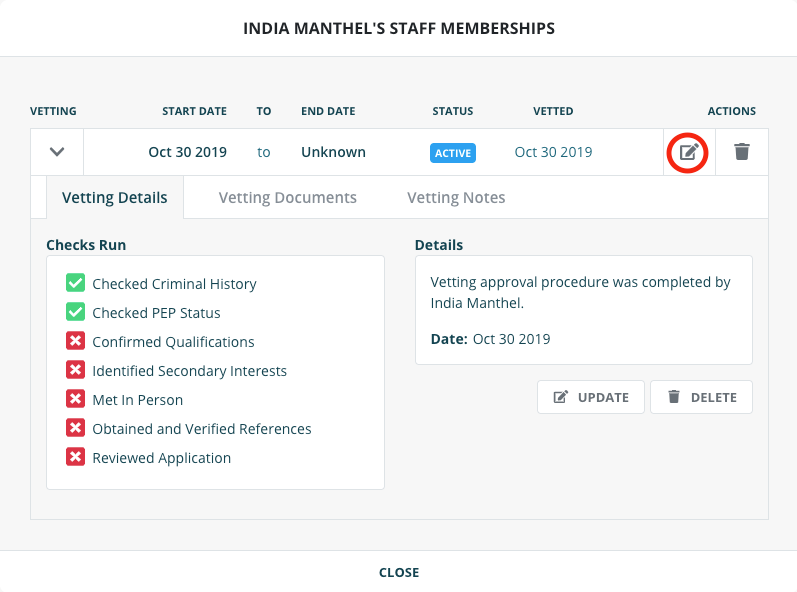
- From the window above, click on the Green "VET" button. This window can be accessed either directly after creation of a staff membership, or by clicking on the Person Icon , found under the ‘Actions’ field adjacent to the user’s name.
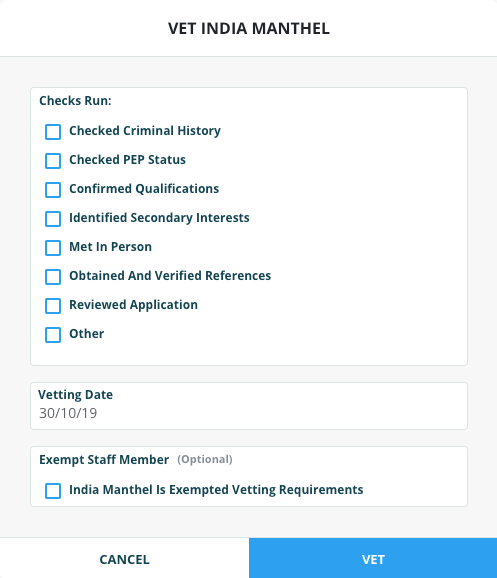
- The following window will appear after clicking the Green "VET" button.
- The list provided above is a guideline of possible checks that may have been conducted by your HR department during the hiring process. You will need to liaise with your HR department to find out what checks were completed. Select the applicable checks conducted.
- There is an ‘other’ option to add additional checks not included in the list. Tick the ‘other’ box and type in the name of the check conducted; click ‘add’. You can add as many additional checks as desired (if any), just remember to click ‘add’ each time after typing in a particular check.
- If the staff member was hired before 1st of January 2019, please disregard steps three & four and select the ‘Exempt Staff Member’ option.
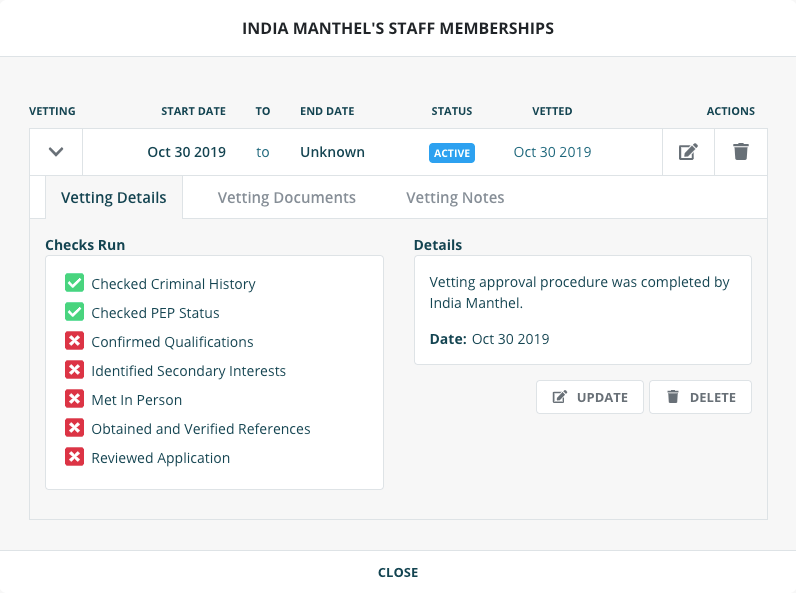
- The following window will appear, displaying which of the checks have been conducted.
- To update the checks completed, click on the button and make any necessary changes.
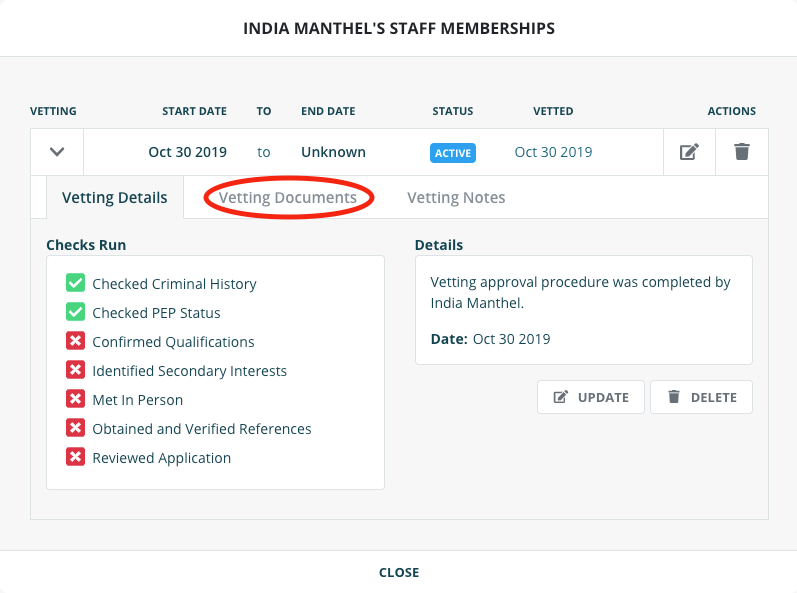
Vetting documents from checks conducted on a staff member can be uploaded to the AMLHub for accessibility and staff monitoring
- Open the staff memberships window either directly after creation of a staff membership, or by clicking on the "Staff icon", found under the ‘Actions’ field adjacent to the user’s name.
- Click on the ‘Vetting Documents’ tab from this window.
- Click on the "+Document" button to upload a document to the AMLHub
- Name the document and click ‘browse’ to select the document from your library.
- Click ‘create’.
- The uploaded document will subsequently be displayed in the following window, under the ‘Vetting Documents’ tab

Before concluding the period of staff membership, please check the CDD register to see if the staff member is assigned to any unverified deals. If this is the case, ensure a new user is added to such deal(s) before the staff member’s period is concluded.
- Open the staff memberships window either directly after creation of a staff membership, or by clicking on the "Staff" icon, found under the ‘Actions’ field adjacent to the user’s name.
- Click on the ‘edit’ icon displayed in the following window.
- Enter the end date of the staff membership for the particular user and click ‘update’.
- Underneath the ‘Staff Member’ tab adjacent to the user’s name, it will now say ‘ended’ with a subsequent end date.
- If the user has left the branch entirely and needs to be removed as a user from the branch, click on the "Trash" icon, found under the ‘Actions’ field adjacent to the user’s name.

If the user has left the branch entirely and needs to be removed as a user from the branch, click on the icon, found under the ‘Actions’ field adjacent to the user’s name.
Removing the staff membership title from a user should be done only if, for example, the
user was added as a staff member by mistake. If this is not the case, users should have
their staff membership period concluded.
Before removing the staff membership, please check the CDD register to see if the staff
member is assigned to any unverified deals. If this is the case, ensure a new user is
added to such deal(s) before the staff member is removed.
- Open the staff memberships window either directly after creation of a staff membership, or by clicking on the "Staff" icon, found under the ‘Actions’ field adjacent to the user’s name.
- Click on the rubbish bin icon displayed in the following window.
- Click ‘delete’.
- Navigate to your CDD Register either by clicking on the CDD Register tile or on the CDD Register section in the left-hand menu bar.
- The following window will appear to indicate the removal of the staff membership from the user.


- Unverified Deals
The deal appears here following its initial creation through either the AMLHub app or desktop - Verified Deals
Unverified deals are moved to this section following the completion of the verification process by someone who has received sufficient training to do so. Once verified, deals can become a listing. - Completed Deals
Deals should be moved to this section of the CDD register from the ‘Verified Deals’ section if a sale is made or the client is lost; in these circumstances, the deal should not be deleted. - All Deals
A combined list of all unverified, verified and completed deals.

The CDD register additionally contains the ‘Activity Log’, which keeps a record of all activity occurring within the CDD register. You can navigate here by clicking on ‘Activity Log’, adjacent to the four tabs mentioned above.
Warnings may appear in the CDD register of the AMLHub desktop in relation to
temporary exceptions.
A warning will appear if a temporary exception has been granted for an individual
and has not yet ‘failed’ or been resolved.
Warnings are displayed in the top right-hand corner of the CDD register. Clicking on
the icon will display the details of any outstanding warnings.
Issues may appear in the CDD register of the AMLHub desktop in relation to temporary
exceptions.
An issue will appear if a temporary exception has surpassed its due date and is now
overdue.
Issues are displayed in the top right-hand corner of the CDD register. Clicking on
the icon will display the details of any outstanding issues
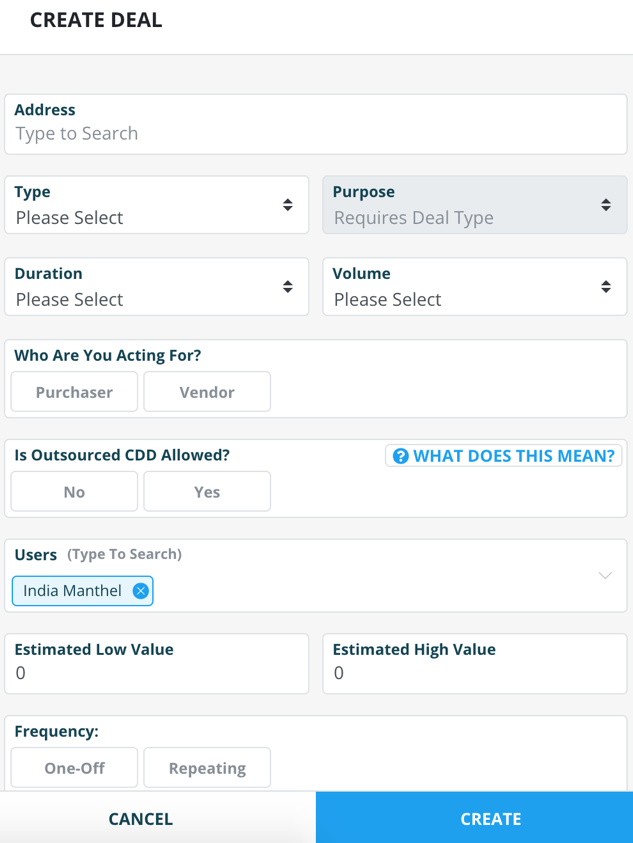
Creating a deal through the AMLHub desktop can be done under the ‘Unverified Deals’ section of the CDD register.
- Click the "+Deal" button
- The following pop-up window will appear.
- Enter the details of the deal.
- A pop-up message will appear to signal the creation of the deal and you will be redirected to the deal’s structure.
- From here, you can subsequently onboard individuals and parties to this deal. to this deal.
Deleting a deal should only be utilised in the instances of duplicates or accidental creation.
When a sale is made, a deal is not sold or a client is lost, these deals should be moved to the ‘Completed Deals’ section of the CDD register as opposed to being deleted.
Deleting an unverified deal on the AMLHub desktop can be done through the ‘Unverified Deals’ section of the CDD register.
- Locate the deal you would like to delete by typing the address of the deal into the ‘Search Deals’ field.
- Click on the "..." icon, found under the ‘Actions’ field to the right of the deal name/address.
- Click 'delete'
- Confirm by clicking "yes" on the pop-up window
Sales agents will only be able to view and edit deals in the CDD register of the AMLHub desktop and/or their ‘Update a Deal’ section of the AMLHub app that they have been assigned to. .
Senior staff members such as the AMLCO, SO, AML ADMIN etc. are able to view all deals in the CDD register of the AMLHub desktop, however, must be assigned to the deal if they want to be able to view and edit the deal through the app.
During the creation of a deal through the app, sales agents are provided with the option to assign users to this deal. If they do not do this, or following the deal being created more users need to be assigned, users can be assigned through the AMLHub desktop.
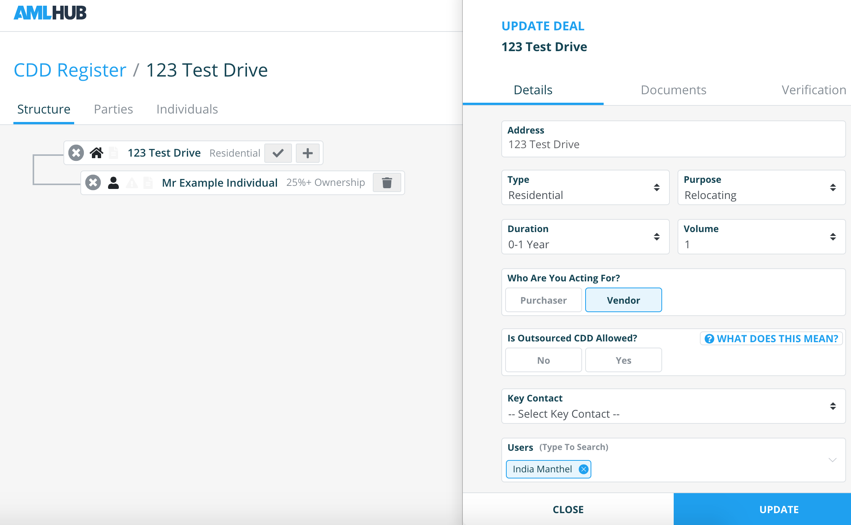
Assigning users to an unverified deal on the AMLHub desktop can be done through the ‘Unverified Deals’ section of the CDD register.
- Locate the deal you would like to assign a user to by typing in the address of the deal into the ‘Search Deals’ field.
- Click on the deal name/address; you will be redirected to the structure of the deal.
- Under the deal’s structure, click on the deal name/address.
- Navigate to your CDD Register either by clicking on the CDD Register tile or on the CDD Register section in the left-hand menu bar.
- A pop-up window of the ‘Update Deal’ page will appear on the right-hand side of the screen.
- Under the ‘Details’ tab of this page, there will be a ‘Users’ section. Click on this section and a drop-down menu will appear; select the user(s) you would like to assign to the deal by clicking on their name(s).
- Click ‘update’.
Onboarding an individual as either a client or beneficial owner can be done following the creation of a deal through the CDD register.
- Locate the deal you would like to onboard the individual to and click on the deal name/address to bring up the structure of the deal.
- Click the "+" button, found to the right of the deal name/address.
- Select ‘add individual’.
- The following pop-up window will appear on the right-hand side of the
screen. Enter the details of the individual into the respective sections.
- The current address of the individual may not necessarily be the address of the property being sold.
- Entering an email address and phone number are especially important if you require outsourced CDD, so the individual can be contacted.
- Click 'create'
- 25%+ Ownership – this is where someone owns more than 25% of the asset, meaning they are a beneficial owner.
- Trustee – trustee of the trust. These are the named trustees in a Trust Deed. For example, for a family trust this would typically be the husband and wife, and their lawyer.
- Settlor – settlor of the trust; this is the named Settlor in a Trust Deed.
- Effective Controller – someone who is in effective control of the asset i.e. Managing Director, who may also be a 25%+ shareholder.
- Acting on Behalf – someone who is instructing you on behalf of the owner. This may be a lawyer or power of attorney.
- Executor – the executor of the will.
Onboarding a party can be done following the creation of a deal through the CDD register.
- Locate the deal you would like to onboard the party to and click on the deal name/address to bring up the structure of the deal.
- Click the "+" button, found to the right of the deal name/address.
- Select ‘add party’.
- The following pop-up window will appear on the right-hand side of the screen. Enter the details of the party into the respective sections of the window.
- Click 'create'
- Click “update”.
- A pop-up message will appear to signal that the party has been successfully created.

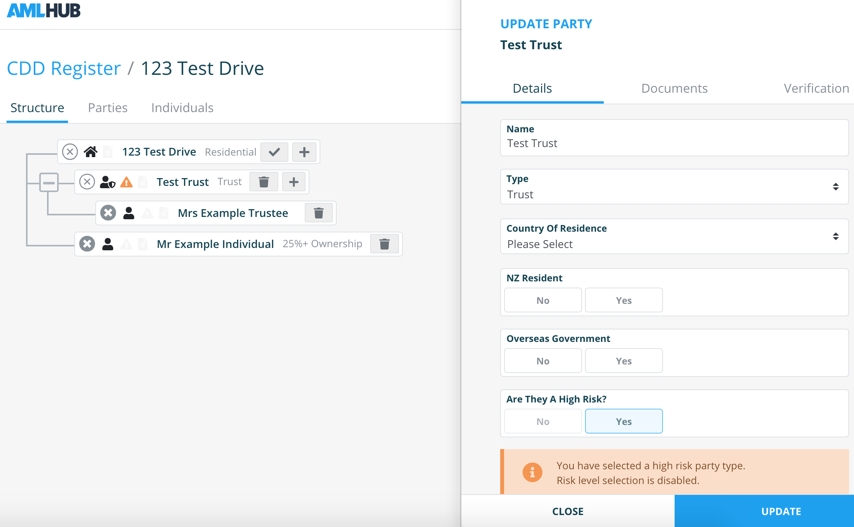
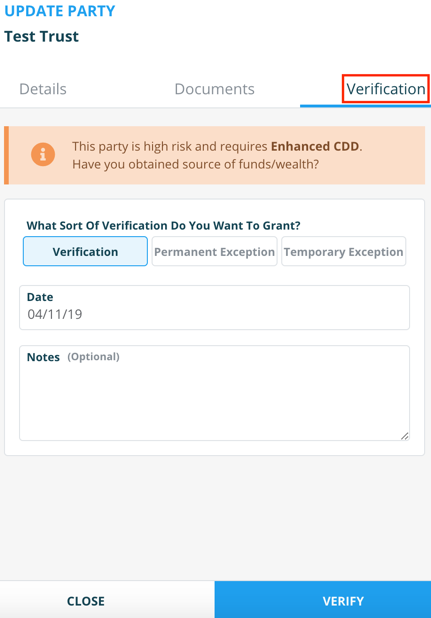
Please note: all trusts are automatically marked as high risk.
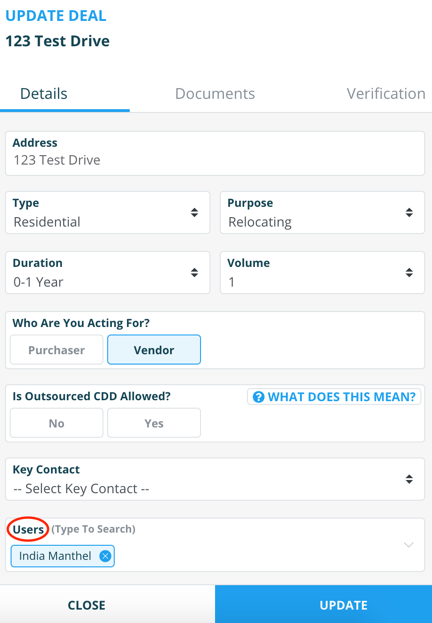
Updating the details of an unverified deal on the AMLHub desktop can be done through the ‘Unverified Deals’ section of the CDD register.
- Locate the deal of interest by typing the address of the deal into the ‘Search Deals’ field.
- Click on the deal name/address; you will be redirected to the structure of the deal.
- Under the deal’s structure, click on the deal name/address.
- A pop-up window of the ‘Update Deal’ page will appear on the right-hand side of the screen
- Make any necessary changes to the details of the deal.
- When satisfied with these changes, click ‘update’.
- A pop-up message will appear to signal that the deal has been successfully updated. It is now safe to click ‘close’, which exits the ‘Update Deal’ page.
Updating the details of a party within an unverified deal can be done through the ‘Unverified Deals’ section of the CDD register.
- Locate the deal containing the party you would like to update by typing the address of the deal into the ‘Search Deals’ field.
- Click on the deal name/address; you will be redirected to the structure of the deal.
- Under the deal’s structure, click on the name of the party you would like to update.
- A pop-up window of the ‘Update Party’ page will appear on the right-hand side of the screen.
- Make any necessary changes to the details of the party.
- When satisfied with these changes, click ‘update’..
- A pop-up message will appear to signal that the party has been successfully updated. It is now safe to click ‘close’, which exits the ‘Update Party’ page.
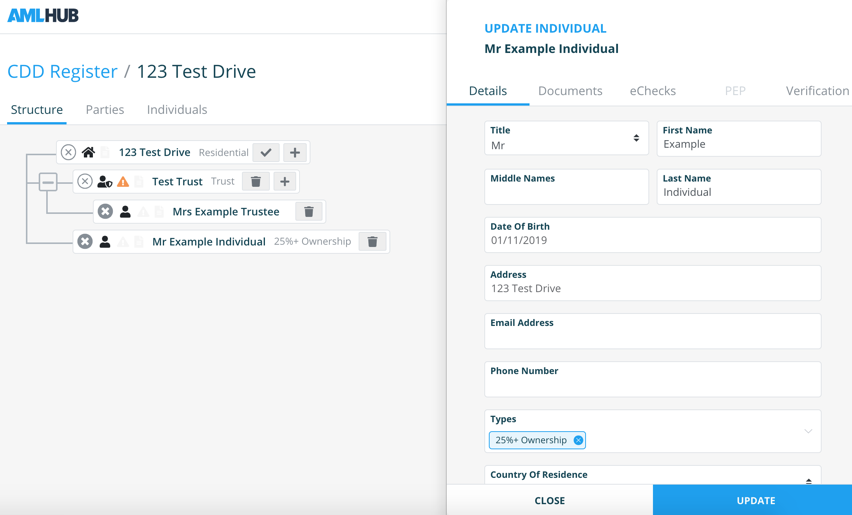
Updating the details of an individual within an unverified deal can be done through the ‘Unverified Deals’ section of the CDD register.
- Locate the deal containing the individual you would like to update by typing the address of the deal in the ‘Search Deals’ field.
- Click on the deal name/address; you will be redirected to the structure of the deal.
- Under the deal’s structure, click on the name of the individual you would like to update.
- A pop-up window of the ‘Update Individual’ page will appear on the right-hand side of the screen.
- Make any necessary changes to the details of the individual.
- When satisfied with these changes, click ‘update’.
- A pop-up message will appear to signal that the individual has been successfully updated. It is now safe to click ‘close’, which exits the ‘Update Individual’ page.
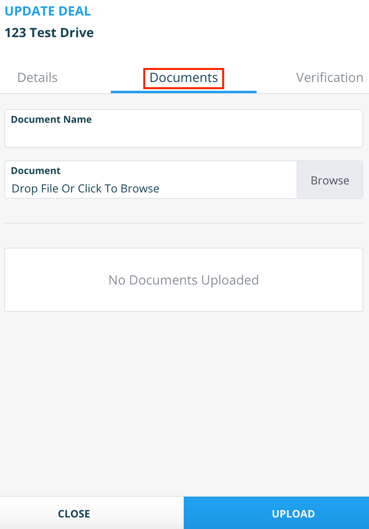
Uploading documents to an unverified deal can be done through the ‘Unverified Deals’ section of the CDD register.
- Locate the deal you would like to upload documents to by typing the address of the deal into the ‘Search Deals’ field.
- Click on the deal name/address; you will be redirected to the structure of the deal.
- Under the deal’s structure, click on the deal name/address.
- A pop-up window of the ‘Update Deal’ page will appear on the right-hand side of the screen.
- Navigate to the ‘Documents’ tab of this page.
- Either drag & drop a document OR click ‘browse’ and subsequently choose the desired document to be uploaded from your library.
- Click ‘upload’.
- A pop-up message will appear to signal a successful document upload.
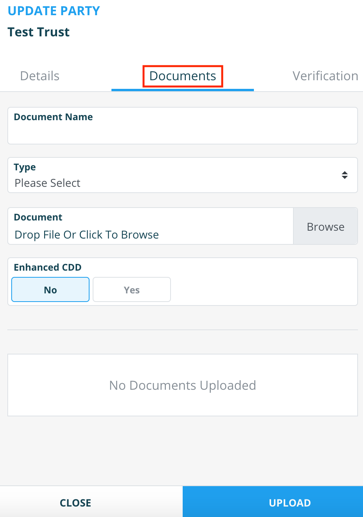
Uploading documents to a party within an unverified deal can be done through the ‘Unverified Deals’ section of the CDD register.
- Locate the deal containing the party you would like to upload documents to by typing the address of the deal into the ‘Search Deals’ field.
- Click on the deal name/address; you will be redirected to the structure of the deal.
- Under the deal’s structure, click on the name of the party you would like to upload documents to.
- A pop-up window of the ‘Update Party’ page will appear on the right-hand side of the screen.
- Navigate to the ‘Documents’ tab of this page.
- Enter the name of the document.
- Select document type.
- Either drag & drop a document OR click ‘browse’ and subsequently choose the desired document to be uploaded from your library.
- Click ‘upload’.
- A pop-up message will appear to signal a successful document upload.
Uploading documents to an individual within an unverified deal can be done through the ‘Unverified Deals’ section of the CDD register.
- Locate the deal containing the individual you would like to upload documents to by typing the address of the deal into the ‘Search Deals’ field.
- Click on the deal name/address; you will be redirected to the structure of the deal.
- Under the deal’s structure, click on the name of the individual you would like to upload documents to.
- A pop-up window of the ‘Update Individual’ page will appear on the right-hand side of the screen.
- Navigate to the ‘Documents’ tab of this page.
- Enter the name of the document.
- Select document type.
- Either drag & drop a document OR click ‘browse’ and subsequently choose the desired document to be uploaded from your library.
- Click ‘upload’.
- A pop-up message will appear to signal a successful document upload.
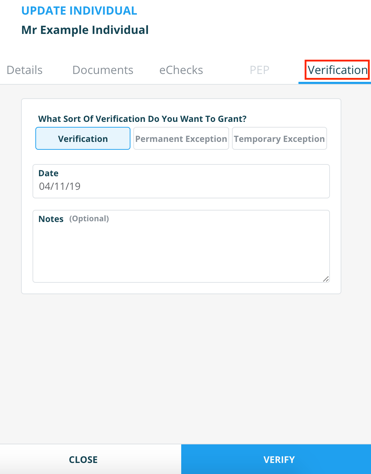
Manually verifying an individual loaded to an unverified deal can be done through the ‘Unverified Deals’ section of the CDD register. Locate the deal containing the individual you would like to verify and click on the deal name/address to bring up the structure of the deal.
- Click on the name of the individual.
- A pop-up window of the ‘Update Individual’ page will appear on the right-hand side of the screen.
- Navigate to the ‘Verification’ tab.
- Select the type of verification.
- Enter the verification date.
- Add any notes you might feel are necessary for keeping an accurate and traceable record of the individual’s verification.
- Select document type.
- Click ‘verify’.
- A pop-up window will appear to signal a successful verification of the individual. It is now safe to click ‘close’ and repeat this verification process for any additional individuals needing to be verified.
If an individual is onboarded with missing information, the system will display the following message under the ‘Verification’ tab of the ‘Update Individual’ page. In this case, undergoing the verification process will not be possible until the listed information is present; additionally, a permanent exception is unable to be granted.
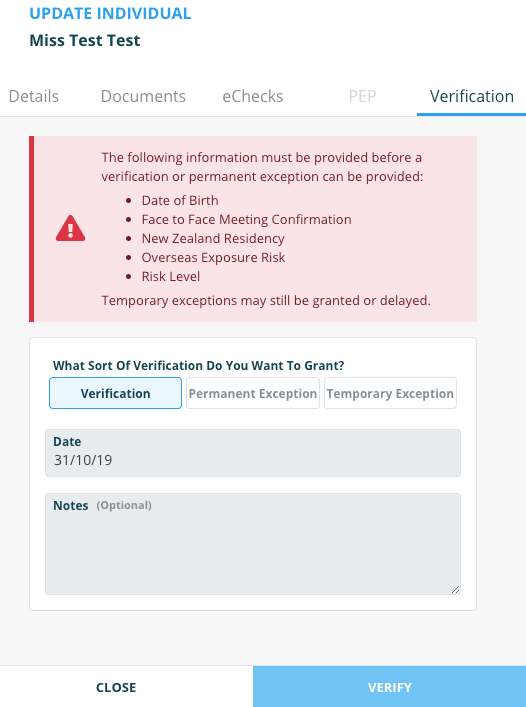
The system, however, will allow for a temporary exception if information is missing.
Manually verifying a party loaded to an unverified deal can be done through the ‘Unverified Deals’ section of the CDD register. Locate the deal containing the party you would like to verify and click on the deal name/address to bring up the structure of the deal.
- Click on the name of the party.
- A pop-up window of the ‘Update Party’ page will appear on the right-hand side of the screen.
- Navigate to the ‘Verification’ tab.
- Select the type of verification.
- Add any notes you might feel are necessary for keeping an accurate and traceable record of the party’s verification.
- Click ‘verify’.
- A pop-up window will appear to signal a successful verification of the party. It is now safe to click ‘close’ and repeat this verification process for any additional parties needing to be verified.
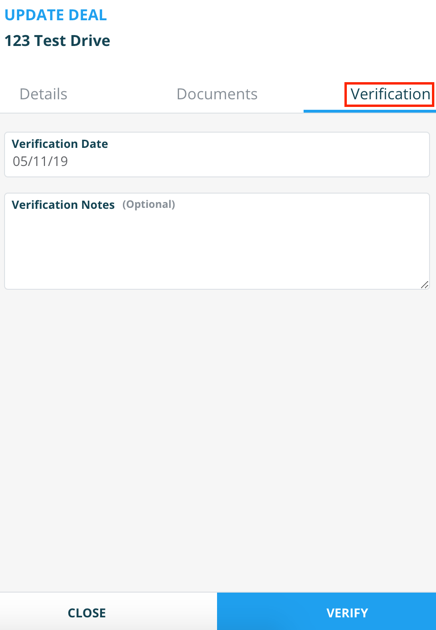
Manually verifying an unverified deal can be done through the ‘Unverified Deals’ section of the CDD register. Locate the deal you would like to verify and click on the deal name/address to bring up the structure of the deal.
- Under the deal’s structure, click on the deal name/address.
- A pop-up window of the ‘Update Deal’ page will appear on the right-hand side of the screen.
- Navigate to the ‘Verification’ tab.
- Enter the verification date.
- Add any notes you might feel are necessary for keeping an accurate and traceable record of the deal’s verification.
- Click ‘verify’.
- A pop-up window will appear to signal a successful verification of the deal. It is now safe to click ‘close’.
- Once all individuals, parties and subsequently the deal itself have been verified, it will then appear under the ‘Verified Deals’ section of the CDD register.
When a sale is made, a deal is not sold or a client is lost, these deals should be moved to the ‘Completed Deals’ section of the CDD register as opposed to being deleted.
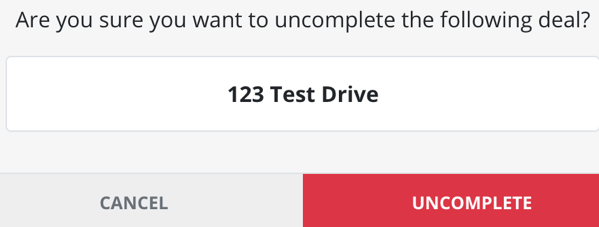
Uncompleting a deal can be done through the ‘Completed Deals’ section of the CDD register.
- Locate the deal you would like to uncomplete by typing the address of the deal into the ‘Search Deals’ field.
- Click on this "..." icon, found under the ‘Actions’ field to the right of the deal name/address.
- Click ‘uncomplete’.
- The following pop-up window will appear. Click ‘uncomplete’.
- The deal will subsequently be moved to the ‘Verified Deals’ section of the CDD register.
A report of all individuals who have been verified by members of a branch in the most recent one-month period can be extracted as a spreadsheet from the AMLHub desktop. This file can be downloaded by clicking on the blue "Verified Parties" button, found under any of the four tabs within the CDD register.
Adding a user to a branch can be done through the ‘Users’ section of the AMLHub desktop.
- Click the " + User button"
- A pop up window will appear
- Enter the first & last name, email and role for the user.
- Click ‘create’.
The correct procedure for a staff member leaving a branch is their staff membership be concluded (not removed) and subsequently their user removed from the branch if desired.
The correct procedure for a staff member leaving a branch is their staff membership be concluded (not removed) and subsequently their user removed from the branch if desired.
Please note: if the user is a staff member, they cannot be removed from a branch until their staff membership period has been concluded.
- Locate the user you would like to remove by typing their name into the ‘Search Users’ field.
- Click on The "Bin"icon, found to the right of the user’s name.
- A pop up window will appear
- click remove
- A pop-up message will appear to signal that the user has been successfully removed from the branch.
Locate the user whose details you would like to update by typing their name into the ‘Search Users’ field.
- Click on the "Paper and pen icon", found under the ‘Actions’ field to the right of the user’s name.
- A pop up window will appear
- Select a role for the user from the drop-down menu.
- Click ‘update’.
- A pop-up message will appear to signal that the user has been successfully updated.
Re-sending a verification email to a pending user can be done through the ‘Users’ section of the AMLHub desktop.
- Click on the icon, found to the right of the user’s name.
- A pop-up window will appear.
- Select a role for the user from the drop-down menu.
- Click ‘resend’.
- Another verification email will be sent to the email address associated with the user’s account. If they do not receive the email, this may be found in their junk mail or spam folder.
Enabling and/or disabling user notifications can be done through the ‘Users’ section of the AMLHub desktop.
- Click on the "Mail" icon, found under the ‘Actions’ field to the right of the user’s name.
- A pop-up window will appear.
- Click on the bar icon displayed to the left of any notification option(s) you would like to turn on or off. The bar will appear grey if turned off and blue if turned on for that user.
- Click ‘update’.
- A pop-up message will appear to signal notifications for the user have been successfully updated.
- If select notifications are turned on for a particular user, you will receive these respective email notifications to the email address associated with your user account.
The training register will display the following four tabs:
- Current Training.
All staff members added to the training register on the left-hand side of the screen, current training assignments displayed on the right-hand side of the screen. - Concluded Training
Staff members with completed training assignments displayed on the left-hand side of the screen, concluded training assignments displayed on the right-hand side. - Your Activities
A list of training assignments created by your branch. - Your Providers
A list of training providers for your particular branch.

The training register additionally contains the ‘Activity Log’. This keeps a record of all activity within the training register. You can navigate here by clicking on ‘Activity Log’, adjacent to the four tabs mentioned above.
There are several colours that can be associated with staff members which are indicative of different participation statuses:
- Orange
No training activities have ever been assigned to the staff member. - Grey
No training activities are currently assigned to the staff member. - Blue
Training has been allocated to a staff member, however, is not yet complete or overdue. The number inside the square shows the number of training activities allocated to the staff member. - Green
Displayed in the ‘Concluded Training’ section of the training register. Indicates the staff member has completed particular training assignments, where the number inside the square shows the number of training activities completed by the staff member. - Red
There are one or more overdue assignment(s) yet to be completed by the staff member.
The training register additionally contains the ‘Activity Log’. This keeps a record of all activity within the training register. You can navigate here by clicking on ‘Activity Log’, adjacent to the four tabs mentioned above.
Warnings may appear in the training register of the AMLHub desktop in relation to training assignments.
Warnings may appear in the training register of the AMLHub desktop in relation to training assignments.
A warning will appear if a staff member has never been assigned any training activities.
Warnings are displayed in the top right-hand corner of the training register. Clicking on this icon will display the details of any outstanding warnings.
Issues may appear in the training register of the AMLHub desktop in relation to training assignments.
An issue will appear if a training assignment has surpassed its due date and is now overdue for an individual(s).
Issues are displayed in the top right-hand corner of the training register. Clicking on this icon will display the respective details of any outstanding issues.
To view any current or overdue training assignments for a staff member – under the ‘Current Training’ section of the training register, click on the "Training Hat" icon, found to the right of the individual’s name.
- Navigate to the ‘Users’ section of the AMLHub desktop through the left-hand sidebar.
- Click on the "ADD" button found under the ‘Staff Member’ field adjacent to the user’s name.
- A window will appear, as shown in the image below.
- Enter the start date of the user; this should be the date the user started with the company. Entering the user’s end date is an optional field.
- Click on the ‘Staff Member Should Be Trained’ tick box, then select a respective training role for the user. If not selected, the staff member will not be added to the training register.
- Please note – staff members must be added to the training register, where if they were not added upon creation this can be done through the training register at a later stage.
- Click ‘create’.
- The staff membership for the user will be created and the staff member will subsequently be added to the training register.

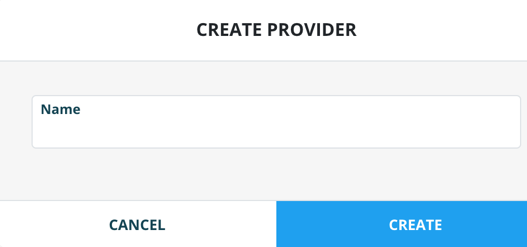
Adding a new training activity provider can be done through the ‘Your Providers’ section of the training register.
- Click on the "+Staff" button
- The following pop-up window will appear.
- Type in the name of the provider.
- Click ‘create’.
- A pop-up message will appear to signal the provider has been created.
- You will now be able to select this provider as the provider of a training activity upon its creation.
A training activity is a one-off or recurring AML compliance training activity that may be either in-house, or from providers such as AML Solutions or third-party providers. A training activity is created under the ‘Your Activities’ section of the training register.
A training assignment is an activity that has been assigned to staff members in the training register. Once an activity has been created, it can then be assigned to staff members and subsequently be displayed as a current assignment in the ‘Current Training’ section of the training register.
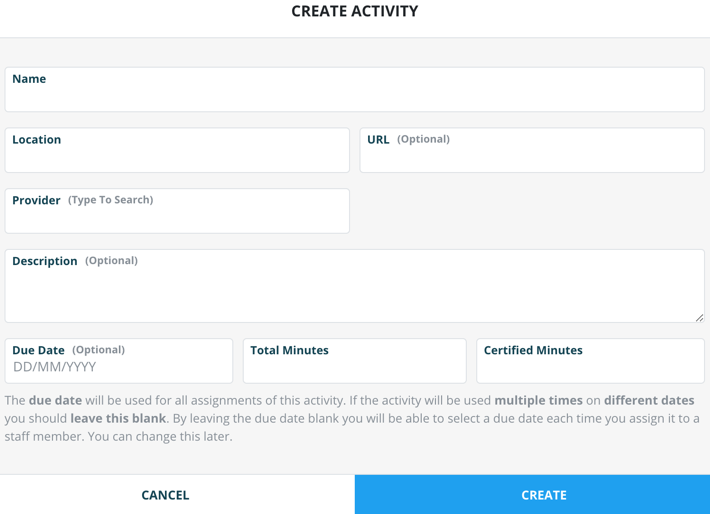
Creating a training activity can be done through the ‘Your Activities’ section of the training register.
- Click on the "+activity" button.
- The following pop-up window will appear.
- Fill in the mandatory fields – name of activity, location, provider, total & certified minutes.
- If the number of certified minutes equates to none for that particular training activity, type ‘0’ into the ‘certified minutes’ field as opposed to leaving it blank.
- A URL link may be added if, for example, the training was completed over an online platform or watched as a video.
- A due date can be entered if the training activity is a non-recurring activity, for example, from a third-party provider.
- Click ‘create’.
- A pop-up message will appear to signal the training activity has been created.
You are able to view the details of a training activity by clicking on the arrow found to the left of the name of the activity.
Archiving a training activity can be done under the ‘Your Activities’ section of the training register.
- Find the training activity you would like to archive from those listed.
- Click on the "Archive Box" icon, found under the ‘Actions’ field adjacent to the name of the training activity.
- The following pop-up window will appear.
- Click ‘archive’.
- A pop-up message will appear to signal the training activity has been archived.
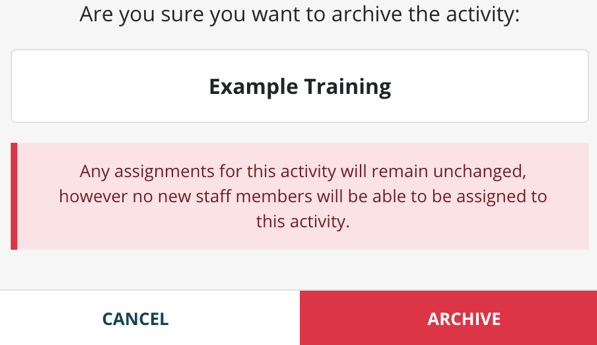
Please note: no new staff members can be assigned to this training activity; however, this will not affect any current assignments of this activity to staff members.
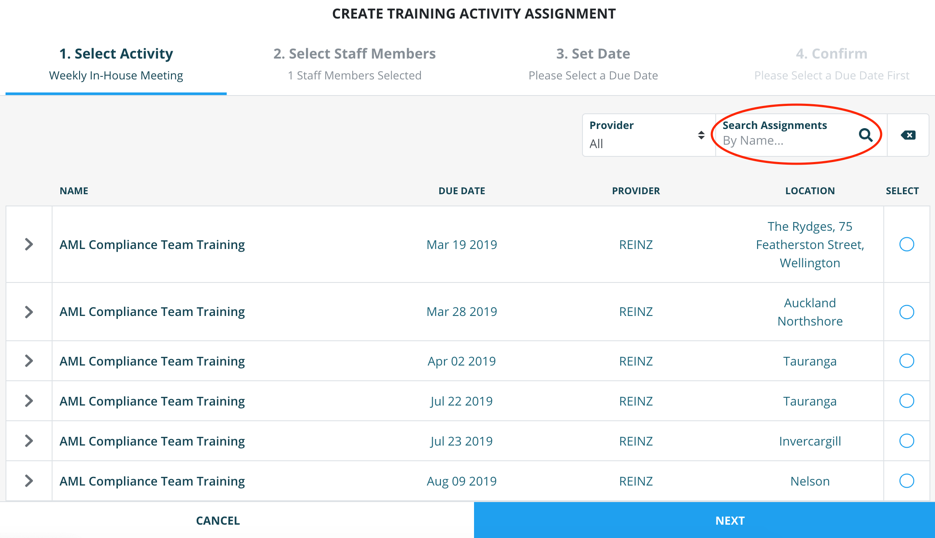
Assigning a training activity to staff members can be done through the ‘Current Training’ section of the training register.
- Click on the "+Assingment" button.
- The following pop-up window will appear. Select an activity – you will be provided with a combined list of activities created by AML Solutions and the activities created by your branch. Use the ‘Search Assignments’ tool to navigate through several pages of activities.
- A list of staff members will appear. Click on the name of each staff member you would like to assign the activity to.
- Click ‘next’.
- Enter a due date for the training assignment. If you selected this date from the calendar, you will be taken directly to the next page. If entering manually, click ‘next’ after typing in the due date.
- The details of the assignment will be displayed, review these details and click ‘create’ if satisfied. If you need to make changes to the assignment before creating it, click ‘back’.
- A pop-up message will appear to signal the creation of a new training assignment. This assignment will now be displayed under the ‘Current Training’ section of the training register, on the right-hand side of the screen.
Once a training activity has been assigned to staff members, you can add additional staff members to an assignment through the ‘Current Training’ section of the training register.
- Look for the training activity you would like to conclude from the list of current training assignments on the right-hand side of the screen.
- Click on the "Grouped People" icon, found to the right of the name of the training activity.
- The following pop-up window will appear. Click the "+ Staff Memeber" button.
- Select from the list of staff members the individual(s) you would like to add. You do not need to select the names of already assigned individuals again.
- Click ‘next’.
- A details page will appear including the activity name and staff members being added.
- When satisfied with these changes, click ‘create’
- A pop-up message will appear to signal the addition of new staff members to a training assignment.
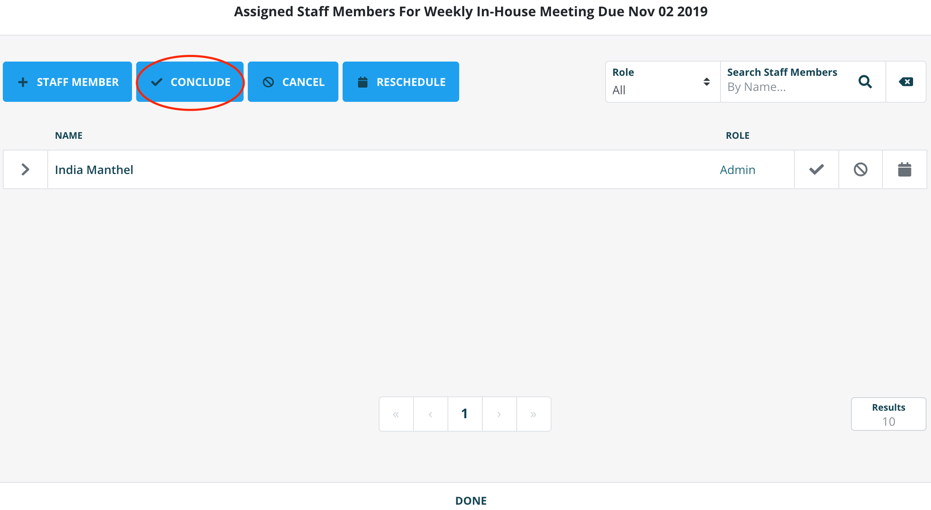
A current training assignment can be concluded through the ‘Current Training’ section of the training register.
- Look for the training assignment you would like to conclude from the list of current assignments on the right-hand side of the screen.
- Click on the "Grouped People" icon, found to the right of the name of the training assignment.
- The following pop-up window will appear. Click ‘conclude’
- All staff members assigned to the training assignment will now be highlighted in blue to signal they will be marked as having completed the training. Deselect any staff members who have not completed/did not attend the training assignment by clicking on their name.
- Click ‘conclude assignments’.
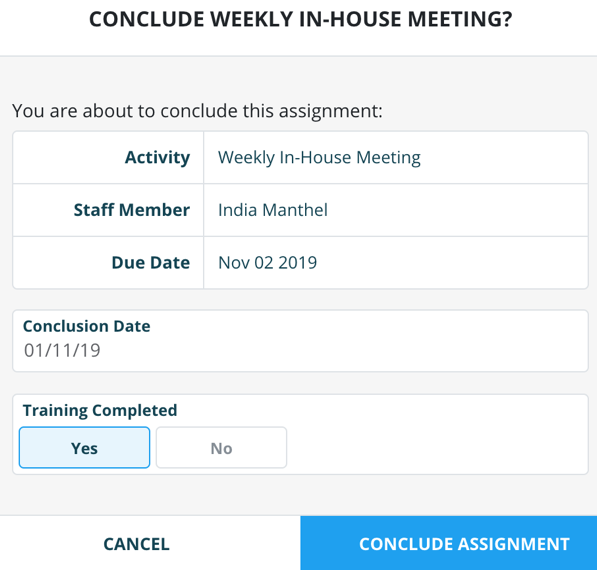
- The following pop-up window will appear.
- Review the displayed details and make changes if necessary.
- Click ‘conclude assignment’.
- This assignment can now be found under the ‘Concluded Training’ section of the training register. If all staff members assigned have completed the training assignment, it will no longer be displayed in the ‘Current Training’ section of the training register.
A current training assignment can be concluded for an individual through the ‘Current Training’ section of the training register.
- Look for the training assignment you would like to conclude from the list of current assignments on the right-hand side of the screen.
- Click on the "Grouped People" icon, found to the right of the name of the training assignment.
- The following pop-up window will appear. Click ‘conclude’
- All staff members assigned to the training assignment will now be highlighted in blue to signal they will be marked as having completed the training. Deselect any staff members who have not completed/did not attend the training assignment by clicking on their name.
- Click ‘conclude assignments’.
- The following pop-up window will appear.
- Review the displayed details and make changes if necessary.
- Click ‘conclude assignment’.
- This assignment can now be found under the ‘Concluded Training’ section of the training register. If all staff members assigned have completed the training assignment, it will no longer be displayed in the ‘Current Training’ section of the training register.
The suspicions register will display the following five tabs:
- Suspicions
Activities or transactions that may need to be formed and subsequently lodged, however, are not yet confirmed as being suspicious. - Formed Suspicions
Activities or transactions that have been confirmed as suspicious. Once a suspicion has been formed, it has 72 hours to be lodged. - Lodged Suspicions
Suspicions that have been submitted by your branch separately to GoAML and subsequently lodged in the AMLHub afterwards. - Resolved Suspicions
Activities or transactions that were potential suspicions, but have turned out not to be suspicious. - All Suspicions
A combined list of all suspicions within the suspicions register.
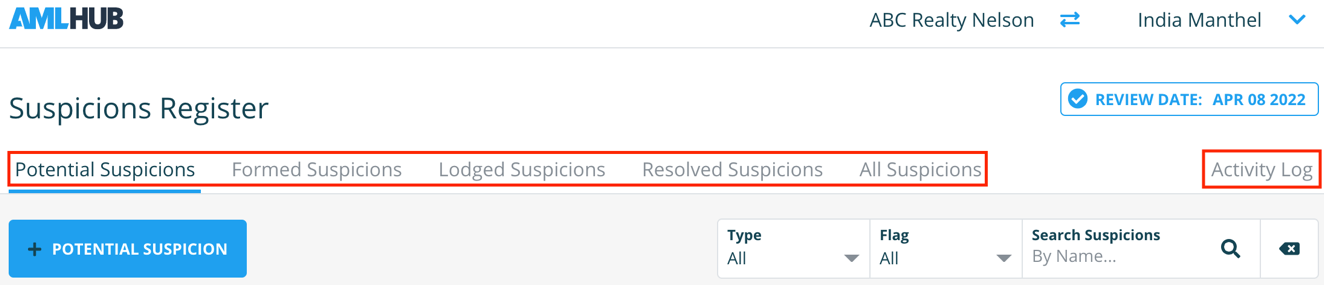
The suspicions register additionally contains the ‘Activity Log’, which keeps a record of all activity occurring within the suspicions register. You can navigate here by clicking on ‘Activity Log’, adjacent to the five tabs mentioned above.
Warnings may appear in the suspicions register of the AMLHub desktop in relation to formed suspicions.
A warning will appear if a potential suspicion has been formed and must be lodged in the next 72 hours.
Issues are displayed in the top right-hand corner of the suspicions register. Clicking on the icon will display the details of any outstanding warnings.
Issues may appear in the suspicions register of the AMLHub desktop in relation to formed suspicions.
An issue will appear if a formed exception has not been lodged following 72 hours of it being formed
Issues are displayed in the top right-hand corner of the suspicions register. Clicking on this icon will display the details of any outstanding issues.
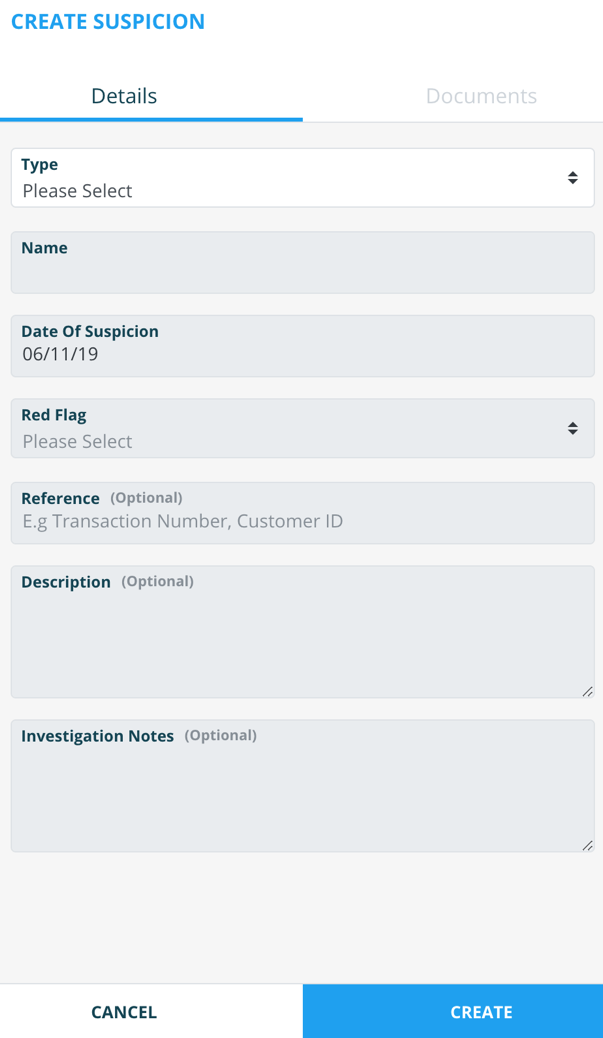
Creating a potential suspicion can be done through the ‘Potential Suspicions’ section of the suspicions register.
- Click on the "+potential suspicion" button.
- The following pop-up window will appear on the right-hand side of the screen.
- Select the type of suspicion.
- Enter the details of the suspicion.
- Click ‘create’.
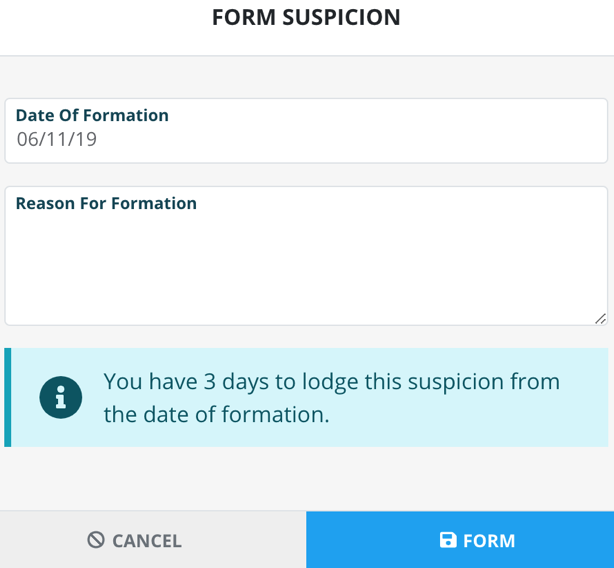
Creating a potential suspicion can be done through the ‘Potential Suspicions’ section of the suspicions register.
- Click on the "..." icon, found under the ‘Actions’ field to the right of the suspicion’s name.
- Click ‘form’.
- The following pop-up window will appear.
- Enter the date of formation.
- Enter the reason for the formation of this potential suspicion.
- Click ‘form’
- The suspicion will now appear under the ‘Formed Suspicions’ section of the suspicions register.
A formed suspicion must be lodged within 72 hours of first being formed in the AMLHub. Before lodging this suspicion in the AMLHub, you must have already lodged the suspicion on the goAML ( https://fiu.police.govt.nz/Home ) platform.
- Click on this "..."icon, found under the ‘Actions’ field to the right of the suspicion’s name.
- Click ‘lodge’.
- The following pop-up window will appear.
- Click ‘lodge’.
- The suspicion will now appear under the ‘Lodged Suspicions’ section of the suspicions register.

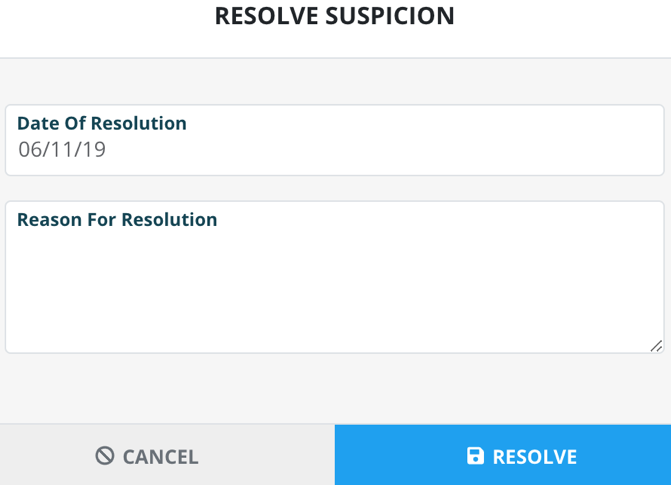
Resolving a potential suspicion can be done through the ‘Potential Suspicions’ section of the suspicions register.
- Click on this "..."icon, found under the ‘Actions’ field to the right of the suspicion’s name.
- Click ‘resolve’.
- The following pop-up window will appear.
- Enter the date of resolution.
- Enter the reason for resolving the potential suspicion.
- Click ‘resolve’.
- The suspicion will now appear under the ‘Resolved Suspicions’ section of the suspicions register.
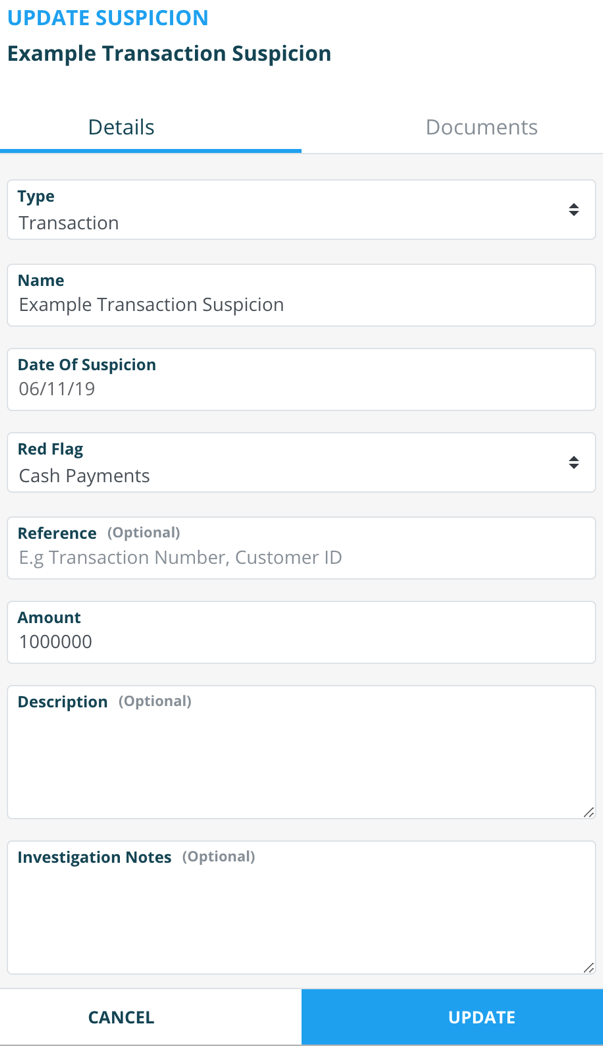
Updating the details of a suspicion can be done through any section of the suspicions register.
- Click on this "..."icon, found under the ‘Actions’ field to the right of the suspicion’s name.
- Click ‘update’.
- The following pop-up window will appear.
- Make any necessary changes.
- Enter the reason for resolving the potential suspicion.
- Click ‘update’.
- A pop-up message will appear to signal that the updates have been saved.